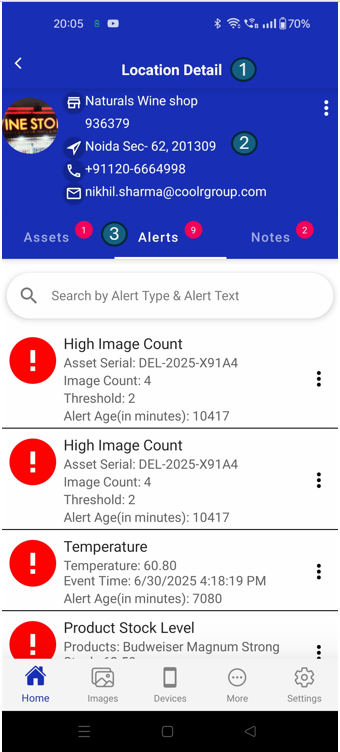
Location Detail
The Location Detail screen provides comprehensive information about a selected location, including all assigned assets and their details. From this screen, you can easily navigate to the location, initiate a call or email, view notes, check alerts, and manage assets associated with the location.
By default, the screen displays the assets data with the Assets tab selected.
Layout
Below is the Location Detail screen with key sections highlighted. Each area is designed to give you quick access to important actions and information related to the selected location.
1. Header
The header displays the title Location Detail and provides navigation controls (such as back or menu buttons), ensuring you always know which screen you are on and can easily return to previous screens.
2. Location Info
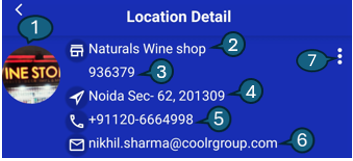
This section provides all essential information and quick actions for the selected location:
1. Avatar Icon
Displays the most recent photo of the location, captured via the mobile app. If no image has been uploaded, a default placeholder icon is shown. Tapping the image opens a full-screen preview, where you can:
- Share the image with others using your device’s sharing options.
- Update the image by capturing a new photo or selecting one from your gallery.
- Remove the image if it is outdated or incorrect.
2. Location Name
Prominently displays the name of the outlet at the top of the section. This helps users quickly confirm which location they are viewing or managing. Tapping the location name opens the Action Menu (see section 7), providing quick access to advanced management options.
3. Location Code
Shows the unique code or identifier assigned to the outlet. This code is useful for distinguishing between locations, especially when names are similar or when referencing locations in reports and communications. Tapping the location code also opens the Action Menu (see section 7), allowing you to perform additional actions related to the location.
4. Address
Displays the complete address of the location, including street, city, and postal code. This information is essential for navigation, verification, and communication purposes. Tapping the address opens your preferred maps application with the location’s address.
5. Phone
If a phone number is available for the location, a phone icon appears next to it. Tapping the icon initiates a call to the location, enabling quick and direct communication with on-site staff or management.
6. Email
If an email address is provided, an email icon is shown. Tapping this icon opens your device’s default email app with the location’s email address pre-filled, making it easy to send messages or inquiries.
7. Action Menu
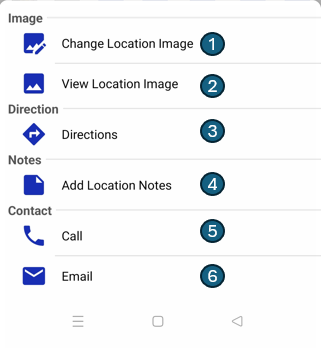
The Action Menu is located on the right side of the Location Info section and provides quick access to advanced management options for the location. Tapping the action menu icon opens an action sheet with the following options:
1. Change Location Image
Update the current image for the location by selecting a new photo from your device.
2. View Location Image
Preview the location image in full screen for a closer look or to share with others.
3. Get Directions
Instantly open your preferred maps app with the location’s address for easy navigation.
4. Add Location Notes
Quickly add notes or comments related to the location for better record-keeping and context.
5. Call
Initiate a phone call to the location directly from your device for quick communication. (Only shown if a phone number is added)
6. Email
Send an email to the location’s address using your default email app. (Only shown if an email address is added)
This menu keeps the main interface clean while allowing you to perform additional actions as needed.
3. Action Features

At the top of the content area, you will find three tabs:
| # | Tab | Description |
|---|---|---|
| 1 | Assets | View and manage all assets assigned to the location. |
| 2 | Alerts | See all open alerts related to the location. |
| 3 | Notes | View and add notes or comments for the location. |